How many times have you said, I know I for one have, that you would love to try sushi. Not alone make it, but also to try some and dispel the old “Noooo, I wouldn’t eat that. Raw fish…!”.
Well here’s the knowledge bit. Sushi is derived from archaic Japanese grammar that meant “sour tasting” indicating the link to fermented rice used to preserve fish.
The oldest form of Japanese sushi, research tells me, still has links to the modern day versions where fermented rice was used to wrap fish.
Today, we just cook the rice and add seasoning and flavours to mimic that fermentation process.
Sashimi, however, is sliced raw fish meat served by itself and that is the bit that most likely daunts people the most.
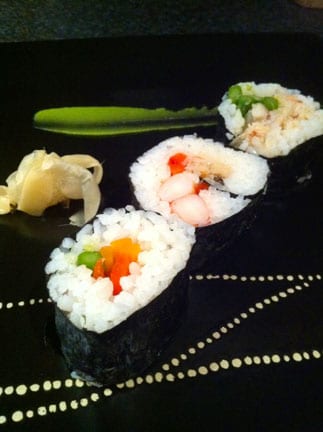
Sushi, in fact, can be a wonderful food to share and in the classical form can take many types of fillings and they don’t all have to be containing raw fish.
Lightly poached prawns, cooked crab meat, raw vegetables or even some of the pickled variety can all make for a super accompaniment to the sushi rice and nori paper.
Cook, fill and roll, that’s about the size of it and the ingredients and tools required are indeed widely available.
All you have to do is add your own twist, style and creative prowess to satisfy your needs and indeed curiosity.
Sushi WHAT YOU NEED – to make 16 slices
For the basics
200g sushi rice
300 water
tspn sugar
dash of rice wine vinegar
pinch of salt
4 sheets of nori paper
crushed nuts
soy sauce for dipping
wasabi
pickled ginger
for the filling
Cooked tiger prawns
Cooked crab meat
Poached asparagus spears
Thin carrot sticks
Sliced peeled peppers
WHAT YOU NEED – to make 16 slices
For the basics
200g sushi rice
300 water
tspn sugar
dash of rice wine vinegar
pinch of salt
4 sheets of nori paper
crushed nuts
soy sauce for dipping
wasabi
pickled ginger
for the filling
Cooked tiger prawns
Cooked crab meat
Poached asparagus spears
Thin carrot sticks
Sliced peeled peppers
WHAT TO DO – Making sushi is all about the preparation and having all the components ready to roll when you go to assemble them. Get a sushi rolling mat. Cheap as chips and widely available. It is made of bamboo and will make your life so much easier when you roll with these delights. First, wash the sushi rice two or three times in cold water in a colander. Then, place in a pot with the 300ml of cold water, a little salt and cover. Bring to the boil and simmer for 10 minutes. Remove from the heat and cover for 25 to 30 minutes. Ideally, if you can do this the night before and allow the rice to cool in the fridge it would be better for the end result. Next, take a sheet of nori paper and place it on top of the rolling mat. It will be dry and crinkly when you initial take it out of the packet. This black seaweed paper is key to keeping everything together so be gentle. Cover the paper with a thin layer of the cooked rice and allow a 1cm gap at the top and bottom of the paper although make sure the rice is filled all the way to the edges on both the left and right. Don’t worry if some falls out as you will be trimming this up afterwards if needs be. Now, in the centre, place a neat line of the fillings you want to include. Try ti keep it to two or three and keep things symmetrical and neat. Sushi is as much about presentation as it is the taste. Next, start to roll the mat with the nori, rice and filling inside. Be sure to keep it nice and tight as you roll. Take the rolls off the mat and set aside The overlap of the paper is OK, do not trim it. Place the sushi rolls on to a flat surface and into the fridge for an hour if possible or as long as time will allow you. The paper, after a time in the fridge, will become moist and at this point, will become easy to cut. Make sure your slices on the roll are even and of the same length. About and 1 inch long each will do nicely. Serve three or four rolls, with the different fillings per person and accompany them with the condiments of the pickled ginger, soy sauce and wasabi….. be careful how you go with that green paste…it’s fiery.